How to Create and Run Java Servlet for Beginners (Annotation)
- Details
- Written by Nam Ha Minh
- Last Updated on 12 September 2020 | Print Email
1. Quick introduction to servlet annotations
The Servlet API 3.0 introduces a new package called javax.servlet.annotation which provides annotation types which can be used for annotating a servlet class. The annotations can replace equivalent XML configuration in the web deployment descriptor file (web.xml) such as servlet declaration and servlet mapping. Servlet containers will process the annotated classes at deployment time.The annotation types introduced in Servlet 3.0 are:- The simplest way to declare a servlet:
@WebServlet("/Submit")
public class QuickServlet extends HttpServlet {
	// servlet code here...
}
Here the servlet QuickServlet is mapped to the URL pattern: /Submit. - Declare a servlet with additional information:
@WebServlet(
	name = "AnnotatedServlet",
	description = "A sample annotated servlet",
	urlPatterns = {"/QuickServlet"}
)
public class QuickServlet extends HttpServlet {
	// servlet code here...
}
Here the servlet is declared with additional information such as name and description. - Declare a servlet with multiple URL patterns:
@WebServlet(
	urlPatterns = {"/foo", "/bar", "/cool"}
)
public class QuickServlet extends HttpServlet {
	// servlet code here...
}
Here the servlet is mapped with three different URL patterns: /foo, /bar and /cool.
- The simplest way to declare a servlet:
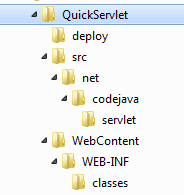
2. Creating directory structure
Since we don’t use any IDE, create the following directory structure:
3. Writing the annotated servlet class
Create the servlet class called QuickServlet.java under src\net\code\java\servlet directory. Paste the following code:package net.codejava.servlet;
import java.io.IOException;
import java.io.PrintWriter;
import javax.servlet.annotation.WebServlet;
import javax.servlet.http.HttpServlet;
import javax.servlet.http.HttpServletRequest;
import javax.servlet.http.HttpServletResponse;
@WebServlet(
name = "AnnotatedServlet",
description = "A sample annotated servlet",
urlPatterns = {"/QuickServlet"}
)
public class QuickServlet extends HttpServlet {
public void doGet(HttpServletRequest request, HttpServletResponse response)
throws IOException {
PrintWriter writer = response.getWriter();
writer.println("<html>Hello, I am a Java servlet!</html>");
writer.flush();
}
public void doPost(HttpServletRequest request, HttpServletResponse response)
throws IOException {
String paramWidth = request.getParameter("width");
int width = Integer.parseInt(paramWidth);
String paramHeight = request.getParameter("height");
int height = Integer.parseInt(paramHeight);
long area = width * height;
PrintWriter writer = response.getWriter();
writer.println("<html>Area of the rectangle is: " + area + "</html>");
writer.flush();
}
} 4. Writing the JSP page
Under WebContent directory, create a JSP file called index.jsp with the following code:<html> <head> <title>Quick Servlet Demo</title> </head> <body> <a href="/QuickServlet">Click here to send GET request</a> <br/><br/> <form action="QuickServlet" method="post"> Width: <input type="text" size="5" name="width"/> Height <input type="text" size="5" name="height"/> <input type="submit" value="Calculate" /> </form> </body> </html>
5. Compiling the servlet
Type the following command to compile the servlet class:javac -cp TOMCAT_HOME\lib\servlet-api.jar" -d CLASS_DIRSRC_DIR\QuickServlet.java
Replace:- TOMCAT_HOME=C:\Program Files\Apache Software Foundation\Tomcat 7.0.
- CLASS_DIR = WebContent\WEB-INF\classes
- SRC_DIR = src\net\codejava\servlet
6. Creating WAR file
Type the following command to package the WebContent directory as a WAR file (Note that there is a dot at the end):jar cfv deploy\QuickServletApp.war -C WebContent .
Note that there is no web.xml file because we have used the @WebServlet annotation to declare and map the servlet.
7. Deploying and testing the Java servlet
Refer to the tutorial: Java servlet quick start guide for beginner (XML) for deploying and testing the application. Other Java Servlet Tutorials:
- Java Servlet Quick Start for beginners (XML)
- Java Servlet and JSP Hello World Tutorial with Eclipse, Maven and Apache Tomcat
- Handling HTML form data with Java Servlet
- Java File Download Servlet Example
- Upload file to servlet without using HTML form
- How to use Cookies in Java web application
- How to use Session in Java web application
About the Author:
 Nam Ha Minh is certified Java programmer (SCJP and SCWCD). He started programming with Java in the time of Java 1.4 and has been falling in love with Java since then. Make friend with him on Facebook and watch his Java videos you YouTube.
| [ ] | 5 kB | |
| [Servlet annotation version] | 2 kB |
Comments