Java Servlet Quick Start Guide for Beginners (Tomcat + XML configuration)
- Details
- Written by Nam Ha Minh
- Last Updated on 11 March 2020 | Print Email
1. A brief overview of Java servlet
A servlet is a server-side component written in Java programming language that receives requests from client and sends responses back.Servlet is the key component that forms a typical Java EE application, beside JSP, EJB, XML and other related technologies. A Java EE application can be packaged in a WAR file (Web ARchive) in order to be deployed on a web server. A web server that can run Java servlet is called a servlet container. The most popular and widely used servlet containers are Apache Tomcat, Glassfish, JBoss, etc.Technically, a servlet is a normal Java class that extends either:- javax.servlet.GenericServletclass for generic client-server protocol, or:
- javax.servlet.http.HttpServlet class for HTTP protocol.
- The JSP presents a form to user for inputting data.
- The servlet receives user’s inputs, processes it and sends response back.
2. Creating directory structure
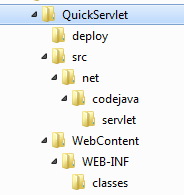
- deploy: we will put generated war file here.
- src: contains Java source files in the package net.codejava.servlet.
- WebContent: contains JSP pages and other web resources.
- WebContent\WEB-INF: we will put web deployment descriptor file (web.xml) here.
- WebContent\WEB-INF\classes: we will put compiled classes here.a
3. Coding the Java Servlet class
Create a Java source file called QuickServlet.java under the directory src\net\codejava\servlet with the following code:package net.codejava.servlet;
import java.io.IOException;
import java.io.PrintWriter;
import javax.servlet.ServletConfig;
import javax.servlet.http.HttpServlet;
import javax.servlet.http.HttpServletRequest;
import javax.servlet.http.HttpServletResponse;
public class QuickServlet extends HttpServlet {
/**
* this life-cycle method is invoked when this servlet is first accessed
* by the client
*/
public void init(ServletConfig config) {
System.out.println("Servlet is being initialized");
}
/**
* handles HTTP GET request
*/
public void doGet(HttpServletRequest request, HttpServletResponse response)
throws IOException {
PrintWriter writer = response.getWriter();
writer.println("<html>Hello, I am a Java servlet!</html>");
writer.flush();
}
/**
* handles HTTP POST request
*/
public void doPost(HttpServletRequest request, HttpServletResponse response)
throws IOException {
String paramWidth = request.getParameter("width");
int width = Integer.parseInt(paramWidth);
String paramHeight = request.getParameter("height");
int height = Integer.parseInt(paramHeight);
long area = width * height;
PrintWriter writer = response.getWriter();
writer.println("<html>Area of the rectangle is: " + area + "</html>");
writer.flush();
}
/**
* this life-cycle method is invoked when the application or the server
* is shutting down
*/
public void destroy() {
System.out.println("Servlet is being destroyed");
}
}This servlet overrides four methods from the HttpServlet class:- init(): the servlet container will invoke this method when the servlet is first accessed by the client. It’s common to place initialization code here. This method is called only once in the servlet’s life.
- doGet(): every time a client makes an HTTP GET request to this servlet, this method is processed. The servlet container injects two objects:
- HttpServletRequest: this object wraps all HTTP request headers so we can access GET/POST parameters as well as other HTTP headers sent from the client, via the methods getParameter() and getHeader(), respectively.
- HttpServletResponse: we use this object to deal with HTTP response such as setting HTTP response headers and sending HTML content back to the client. In this servlet’s doGet() method, we send a simple HTML code which conveys a message “Hello, I am a Java servlet!” to the client.
- doPost(): this method is invoked whenever a client makes an HTTP POST request. Similar to the doGet() method, it also takes an HttpServletRequest object and HttpServletResponse object as arguments. In this method, we retrieve values of two parameters width and height of a rectangle from the request to calculate the area and send result back to the client.
- destroy(): the servlet container will invoke this method when it needs to remove the servlet, as the containing application is being stopped or the server is shutting down.
4. Coding JSP page
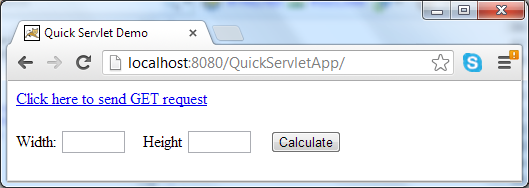
Create a JSP file called index.jsp under the directory WebContent with the following HTML code:<html> <head> <title>Quick Servlet Demo</title> </head> <body> <a href="/QuickServlet">Click here to send GET request</a> <br/><br/> <form action="QuickServlet" method="post"> Width: <input type="text" size="5" name="width"/> Height <input type="text" size="5" name="height"/> <input type="submit" value="Calculate" /> </form> </body> </html>In this JSP page:
- We put a hyperlink with the attribute href=”QuickServlet” which points to relative path of the servlet (we will configure URL mapping for the servlet shortly). Clicking on this link will generate an HTTP GET request to the server, and the servlet’s doGet() method will be invoked.
- To demonstrate sending an HTTP POST request to the servlet, we create a simple form with two text fields: width and height. The form’s attribute action is set to the servlet’s relative path. The submit button is entitled as “Calculate”.
5. Declaring and configuring mapping for the servlet in web.xml
In order to have the servlet be able to serving client’s requests, you have to declare and configure mapping for the servlet in web deployment descriptor file. Create an XML file called web.xmlunder the directory WebContent\WEB-INF with the following XML code:<?xml version="1.0" encoding="UTF-8"?> <web-app xmlns:xsi="http://www.w3.org/2001/XMLSchema-instance" xmlns="http://java.sun.com/xml/ns/javaee" xmlns:web="http://java.sun.com/xml/ns/javaee/web-app_2_5.xsd" xsi:schemaLocation="http://java.sun.com/xml/ns/javaee http://java.sun.com/xml/ns/javaee/web-app_3_0.xsd" id="WebApp_ID" version="3.0"> <display-name>Quick Servlet Demo Application</display-name> <servlet> <servlet-name>QuickServlet</servlet-name> <servlet-class>net.codejava.servlet.QuickServlet</servlet-class> </servlet> <servlet-mapping> <servlet-name>QuickServlet</servlet-name> <url-pattern>/QuickServlet</url-pattern> </servlet-mapping> </web-app>As we can see, the servlet is declared using the <servlet> element and its children:
- <servlet-name>: specifies a descriptive name for the servlet.
- <servlet-class>: specifies fully qualified name of the servlet class.
- <servlet-name>: specifies name of a servlet which is declared using the <servlet> element.
- <url-pattern>: specifies a URL pattern to be mapped with the servlet. The pattern can be exact match, extension match or directory match. Here we specify the exact match.
6. Compiling the servlet
Before doing the compilation, make sure you set the PATH environment variable includes the JDK_HOME\bin directory, so that the tools javac and jar can be accessed in the command line prompt.In order to compile the servlet source code, we must have a servlet API jar file available in the classpath. The servlet API jar file usually provided by the servlet container. In case of Tomcat 7.0, the jar file is placed under TOMCAT_HOME\lib directory and is named as servlet-api.jar.Open a command line utility of the operating system and change the working directory to the directory QuickServlet as outlined in the directory structure. Type the following command:javac -cp TOMCAT_HOME\lib\servlet-api.jar" -d CLASS_DIRSRC_DIR\QuickServlet.java
Replace the names TOMCAT_HOME, CLASS_DIR and SRC_DIR with the following values:- TOMCAT_HOME: is the Tomcat’s installation directory on your computer, for example: c:\Program Files\Apache Software Foundation\Tomcat 7.0. If the path contains spaces, put it inside double quotes like this: “path contains spaces”.
- CLASS_DIR = WebContent\WEB-INF\classes
- SRC_DIR = src\net\codejava\servlet
7. Packaging the web application
The standard way to deploy a Java EE application is packaging it as a WAR file which can be deployed on a web server. At command prompt, type the following command (note that there is a dot at the end):jar cfv deploy\QuickServletApp.war -C WebContent .
The jar program will put everything in the directory WebContent into a single zip-format archive called QuickServletApp.war under the directory deploy.
8. Deploying the web application
Now we are ready to deploy the QuickServletApp.war file on Tomcat server. Copy it to Tomcat’s webapps directory:copy deploy\QuickServletApp.war TOMCAT_HOME\webapps
Start Tomcat by executing the Tomcat7.exe program under TOMCAT_HOME\bin directory: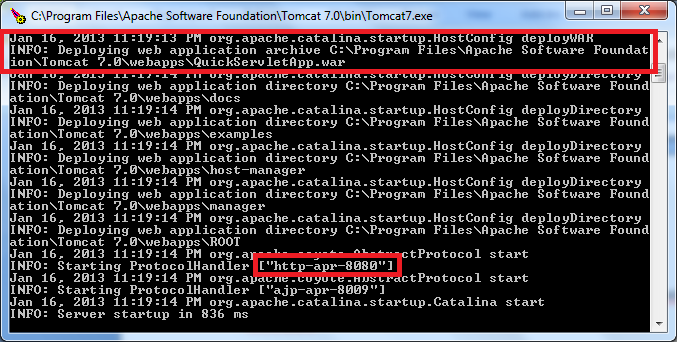 From the logging in the console, we can see that the file QuickServletApp.war is deployed and the HTTP server is listening on the port number 8080.
 9. Testing the servlet
Now open a web browser and type the following URL into the address bar:http://localhost:8080/QuickServletApp
Because we don’t specify a specific page so the default page (index.jsp) is loaded as seen below:To test the servlet with an HTTP GET request, click on the hyperlink “Click here to send GET request”. The following screen is displayed: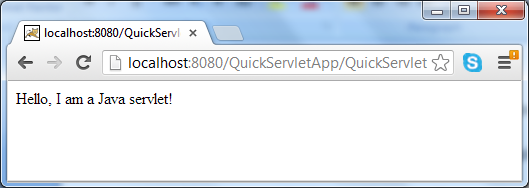 To test the servlet with an HTTP POST request, click browser’s back button and enter two numbers into the text fields width and height:
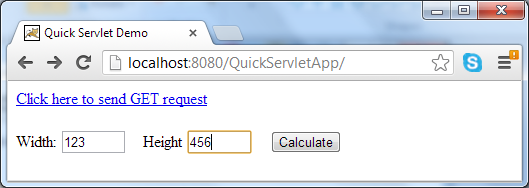 Click on the Calculate button, the servlet will return the computed area as the result:
 So far we have gone through the journey with Java servlet from scratch. We have the project available for download in the attachment section.
 Other Java Servlet Tutorials:
- How to Create and Run Java Servlet for Beginners (Annotation)
- Java Servlet and JSP Hello World Tutorial with Eclipse, Maven and Apache Tomcat
- Handling HTML form data with Java Servlet
- Java File Download Servlet Example
- Upload file to servlet without using HTML form
- How to use Cookies in Java web application
- How to use Session in Java web application
About the Author:
 Nam Ha Minh is certified Java programmer (SCJP and SCWCD). He started programming with Java in the time of Java 1.4 and has been falling in love with Java since then. Make friend with him on Facebook and watch his Java videos you YouTube.
| [ ] | 6 kB |
Comments